CloudReady 是基于Chromium OS 编译版本,硬盘安装非常简便,支持非常多的老机器,个人用户可以免费从其网站上下载获取。一些其它特性自行搜索了解吧。硬盘安装的步骤非常简单,但是会擦出所有数据,请谨慎操作。本文只讲如何在虚拟机中安装chrome os.
1.首先,需要 安装Vitrual Box 虚拟机;mac ,pc版都可以:点击这里下载
2.安装虚拟机完成后,新建一个Virtualbox VM 比如命名ChromeOS,类型为linux,other linux。参考的设置参数:
设置内存大小 1024 (1 GB)
创建 VDI disk,假设命名chromehd.vdi,设置为Sata,大小(12 GB) ,
Enable EFI
Enable PAE
2个CPU
网络选择 “桥接”[***]
3.下载CloudReady。点击这里去下载->
下载完成后文件cloudready-free-44.1.9.bin.zip,解压出cloudready-free-44.1.9.bin 文件。Mac 建议使用The Unarchiver.注意解压出的文件后缀是.bin.
4.转换文件为vdi.
mac 下,在终端中,进入 /Applications/VirtualBox.app
./VBoxManage convertfromraw /Users/XX/Downloads/cloudready-free-44.1.9.bin /Users/XX/Downloads/cloudready.vdi
等待片刻完成。
5. 设置VitrualBox VM,配置虚拟机ChromeOS。在存储管理标签添加cloudready.vdi,并设置为port 0,chromehd.vdi port为1.
6.设置完成,启动虚拟机。进入CloudReady 界面。按Ctrl + Alt + F2进入命令行,以下是节选官方手动安装步骤 。使用用户chronos,密码chrome,执行:sudo chromeos-install –skip_src_removable –dst /dev/sdb
- When the first screen comes up and asks you to select your network, press Ctrl + Alt + F2.
- You will find yourself at a command line.
- the username is: chronos
- the password is: chrome
- FIRST, determine your install destination by running “sudo fdisk -l“
- You can look at the device sizes to find out which device is your HDD (usually sda)
- To install, type the following commands:
- cd /usr/sbin
- sudo chromeos-install –dst /dev/sdX
- NOTE: If the above cmd fails, try “sudo chromeos-install –skip_src_removable –dst /dev/sdX”
- replace “sdX” above with the letter of your drive
- Type the password listed above (chrome)
- You will be asked to confirm the source and destination – don’t proceed if you aren’t sure (or unconcerned with wiping any device)
- When sure, type Y and press enter.
- Now you wait. You may see some errors or warnings – don’t worry unless everything fails
- As far as I can tell, they can be ignored. Maybe someone can shed some light on the error and the cause. Maybe even a prevention/fix.
- The process will take 5-10 minutes.
- When the message “Please shutdown, remove the USB device, cross your fingers, and reboot.” appears,
- Press CTRL + ALT + F1 to get back to the Welcome screen.
- Click Shutdown, remove your USB stick, and reboot.
- Marvel in your awesome, you are now !
7.至此,安装完成,暂时不要重启虚拟机,设置cloudready.vdi port 为3 ,大于1就可以,重新启动。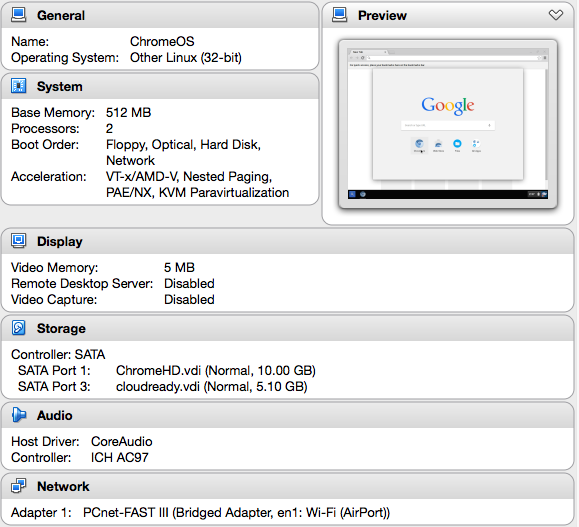
8.多么亲切熟悉的界面:
